


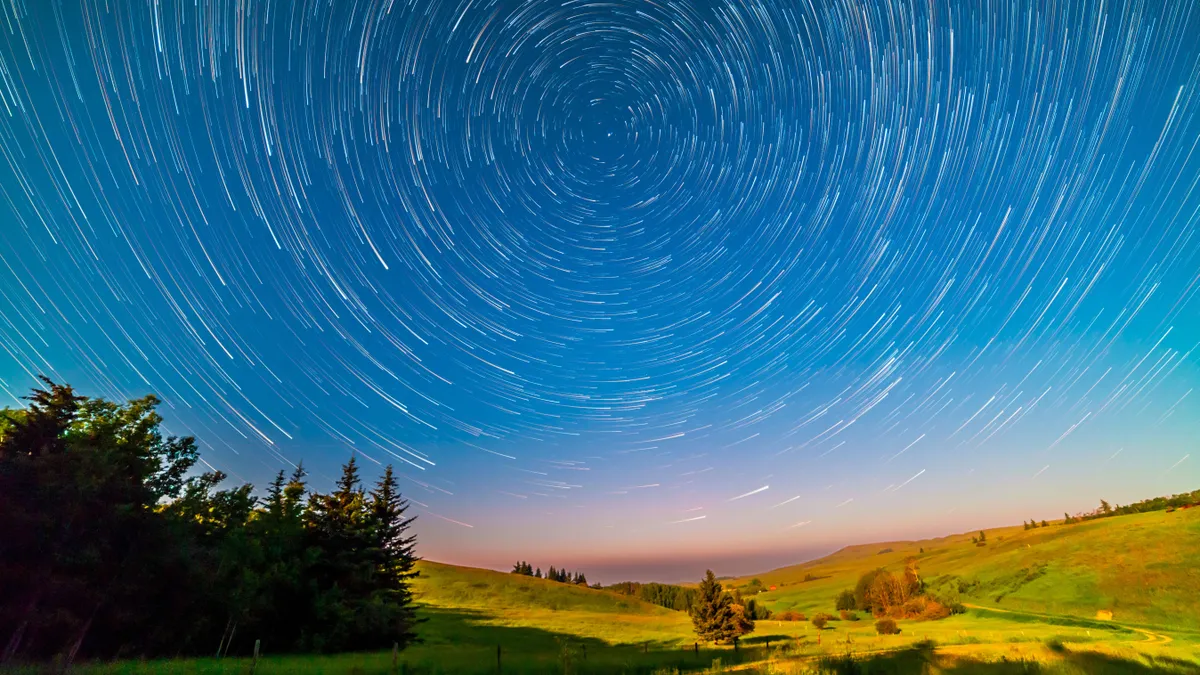
Curious about astrophotography? Trying to photograph star trails is a great place to start. Star trails are long exposure images that show the movement of stars across the night sky and make for interesting and visually captivating images. Like all astrophotography, they require some planning and technical know-how to get right, but the technique behind them is relatively simple. Our guide will tell you all you need to know to get perfect star trail images. For those who are extra keen, you can check out more tips in our astrophotography for beginners guide.
Equipment
What’s the single most important piece of equipment for star trail photography? The humble tripod! A good sturdy tripod is essential. You’re going to be shooting long exposures and you need a tripod to hold the weight of your camera/lens combo, as well as staying stable in windy conditions. You can’t go wrong with a Manfrotto Tripod for sturdiness, although the aluminum versions are considerably heavier (but cheaper!) than the carbon fiber equivalents. The Peak Design Tripod with built-in ball head is the neatest, smallest tripod on the market but you may find its lack of height a little limiting.
For the highest quality star trail images, a full frame camera is your friend, perhaps one of the best cameras for astrophotography, but you’ll get good quality images with most mid-range APS-C and micro four thirds sensors. Olympus cameras have an amazing feature called ‘Live Composite’ which means you can create your star trail images in camera by building up the shot gradually – the E-M1 Mk III is a particular favorite. Our guide on DSLR vs mirrorless camera for astrophotography will help you find a camera suitable for you.

If you want impressive star trail images you’ll need a wide-angle lens – we’re quite fond of the Canon EF 16-35mm f/2.8L III USM lens. Typical focal lengths go from 10 mm – 35 mm, depending on how much landscape and sky you want to capture in your shot. Of course, you can also shoot with a telephoto lens for short exposure times, but you won’t capture such long trails or so much of the sky. Your lens needs to have a wide aperture of around f2.8 – f4; this is essential to let as much light as possible into your image. We’d always advise spending your money on a lens over a new camera – good glass makes your image.
Lastly, we’d highly recommend investing in an intervalometer. This is a programmable remote shutter release that allows you to avoid camera shake, set the exposure time, the time interval between each shot, and the total number of photos you want to take. The Canon TC-80N3 is the best on the market, but Yongnuo makes some cheaper ones that are great to start out with.
It also goes without saying that you’ll need good quality memory cards, extra batteries (kept in your pockets to keep them warm), and a headlamp for focusing and general safety.
Preparation

As with all astrophotography, you want to be as far away from light pollution as possible. You can photograph star trails in the middle of a city, but there won’t be as many stars visible. A new Moon also washes less stars out of the sky and you’ll want a clear night without heavy cloud cover. If you want to capture the full ‘rotating sky’ effect in the Northern Hemisphere, you’ll need to be shooting north at Polaris. An app like PhotoPills will help you plot out your shoot and we’d always recommend visiting your location in the daylight to plan where you’ll be shooting from.
Taking your shot
In the old days of film, we took star trail shots by simply leaving the shutter open for a long time. The trouble with digital technology is that digital camera sensors can get very hot if left open for a long time. So, it’s best to shoot lots of shorter exposure shots and stack them together afterwards in post production. For optimum results, you’ll want to shoot around 50-100 exposures of around 30 seconds each. If this sounds too difficult, then start off by shooting around 10-20 exposures of around 3 minutes instead.
Always shoot in RAW, so that you’ve got full options in post production, and make sure you turn off your in-camera noise reduction – if you leave it on you will end up with small gaps in your trails (you might find our tips on how to reduce noise in astrophotography helpful). Use your wide-angle lens on its maximum aperture (ideally f2.8 – f4) and shoot at around ISO 800 to start with (you may need to increase your ISO if you’re not getting enough light into your camera). Set your lens to manual focus and either pre-focus it to infinity or shine a torch on something around 20 m away, focus using autofocus, and then switch back to manual. Make sure you take some test shots before you start and zoom in to check that your focus is sharp.
Composition is key with star trail images. You need a subject in your foreground to situate your star trails around. Hills, mountains, trees, buildings – anything that frames your sky and draws the viewer into the image is ideal. Once you’re ready to start shooting, make sure you’ve got a fresh battery in your camera, set up your intervalometer, and start taking photos. (You can shoot with a normal remote release, but you’ll need to set up your timings etc. manually.)
Editing star trails images

It’s hard to beat Adobe Photoshop, out of all the best photo editing apps, for working with star trail images. Open your selected images in Camera Raw, select your first image, and edit it to your liking. Then select all the images, right click, and select Develop Settings > Previous Conversion. This will synchronize your editing across all the images.
With the photographs still selected, click Tools > Photoshop > Load files into Photoshop layers. The photos will now load into one image with multiple layers. Starting from the bottom layer (make just this layer visible by clicking on the eye icon on each other layer) select Layer Blending Options and then Lighten. As you repeat this for each layer, you will start to see more and more star trails appear. If there are any trails you don’t want to appear you can simply use the brush tool and paint over them in black. This will make them disappear. Lastly, flatten your image.
If you don’t have Photoshop, StarStax is a great free piece of software that will process a star trails image in around five minutes.
Star trails are a great way to dip your toe in the water of astrophotography and the results always have the ‘wow’ factor. Why not get out tonight and start experimenting?