Space Verdict
Affinity Photo 2 is an incredibly powerful subscription-free editing program that rivals industry giants like Photoshop, with a few specific features that are music to an astrophotographer's ears. We really enjoyed using it and we think it will only improve over time.
Pros
- +
Subscription-free
- +
Non-destructive RAW editing
- +
Dedicated astrophotography stacking tool
- +
Can record 'macros' to automate time-consuming workflows
Cons
- -
No option to pay smaller monthly payments
- -
Has a learning curve
- -
No library organization tools
- -
No mobile app or social media publishing
Why you can trust Space.com
Affinity Photo 2 is a powerful image editing software that offers a wide range of features and tools to help users create stunning digital art, edit photos, and enhance their images. Developed by Serif, Affinity Photo 2 is a brilliant alternative to popular editing software giants like Adobe Photoshop. Affinity Photo 2 is known for its advanced capabilities, including professional-level editing tools, high-quality image processing and an intuitive interface — making it a popular choice for photographers, designers, and digital artists. Whether you're a beginner or a professional, Affinity Photo 2 offers the tools and features you need to take your creativity to the next level.
In our original Affinity Photo review back in 2021, we thought that it was a great piece of software with a good selection of some basic editing tools and we enjoyed the tone mapping and liquifying capabilities. While it's had a bunch of updates along the way over the 8 years between V1 and V2, V2 has some whole new features which may be worth upgrading to Affinity Photo 2 for. We rated Affinity Photo 2 very well in our best photo editing apps guide, and we think it's a fantastic affordable alternative to Photoshop.
Affinity Photo 2 review 2023
Affinity Photo 2: Pricing and Subscription
Affinity Photo 2 is subscription free, much to the delight of those who want to own their software outright rather than paying a monthly fee as you do with Lightroom and Photoshop. At the time of writing, you can purchase Affinity Photo 2 for Mac or Windows for $69.99/£69.99, and it’s also available on the iPad for $19.99/£19.99. If you want the entire Affinity collection known as V2 (which includes software Photo, Publisher and Designer), you can purchase the universal license for $169.99/£169.99 and get all the apps on all the platforms. And, if you upgrade from V1, they’re also running an offer where you’ll get 25% off when you upgrade.
The disadvantage with subscription-free software is that you only pay for that specific version of the software, so in this instance, when V3 eventually comes out, you will have to pay to upgrade to that version from V2. However, there were 8 years between the 2014 V1 and 2022 V2 release, with many updates in-between, so we think that $69.99 for potentially up to 8 years worth of the software is pretty good.
There's also no option to pay for the license in monthly installments. While $69.99 is affordable for such a powerful editing program, not everyone can afford to shell out $69.99 in one go, especially given the cost-of-living crisis and the rise in food & utility costs over the last few years. We're not suggesting Affinity switches to a subscription basis, but offering users an option to pay the $69.99 split across a fixed number of payments may make the software more accessible to a lot of people. That said, Affinity does offer a 30-day free trial for those who want to try before they buy.
Affinity Photo 2: User Interface
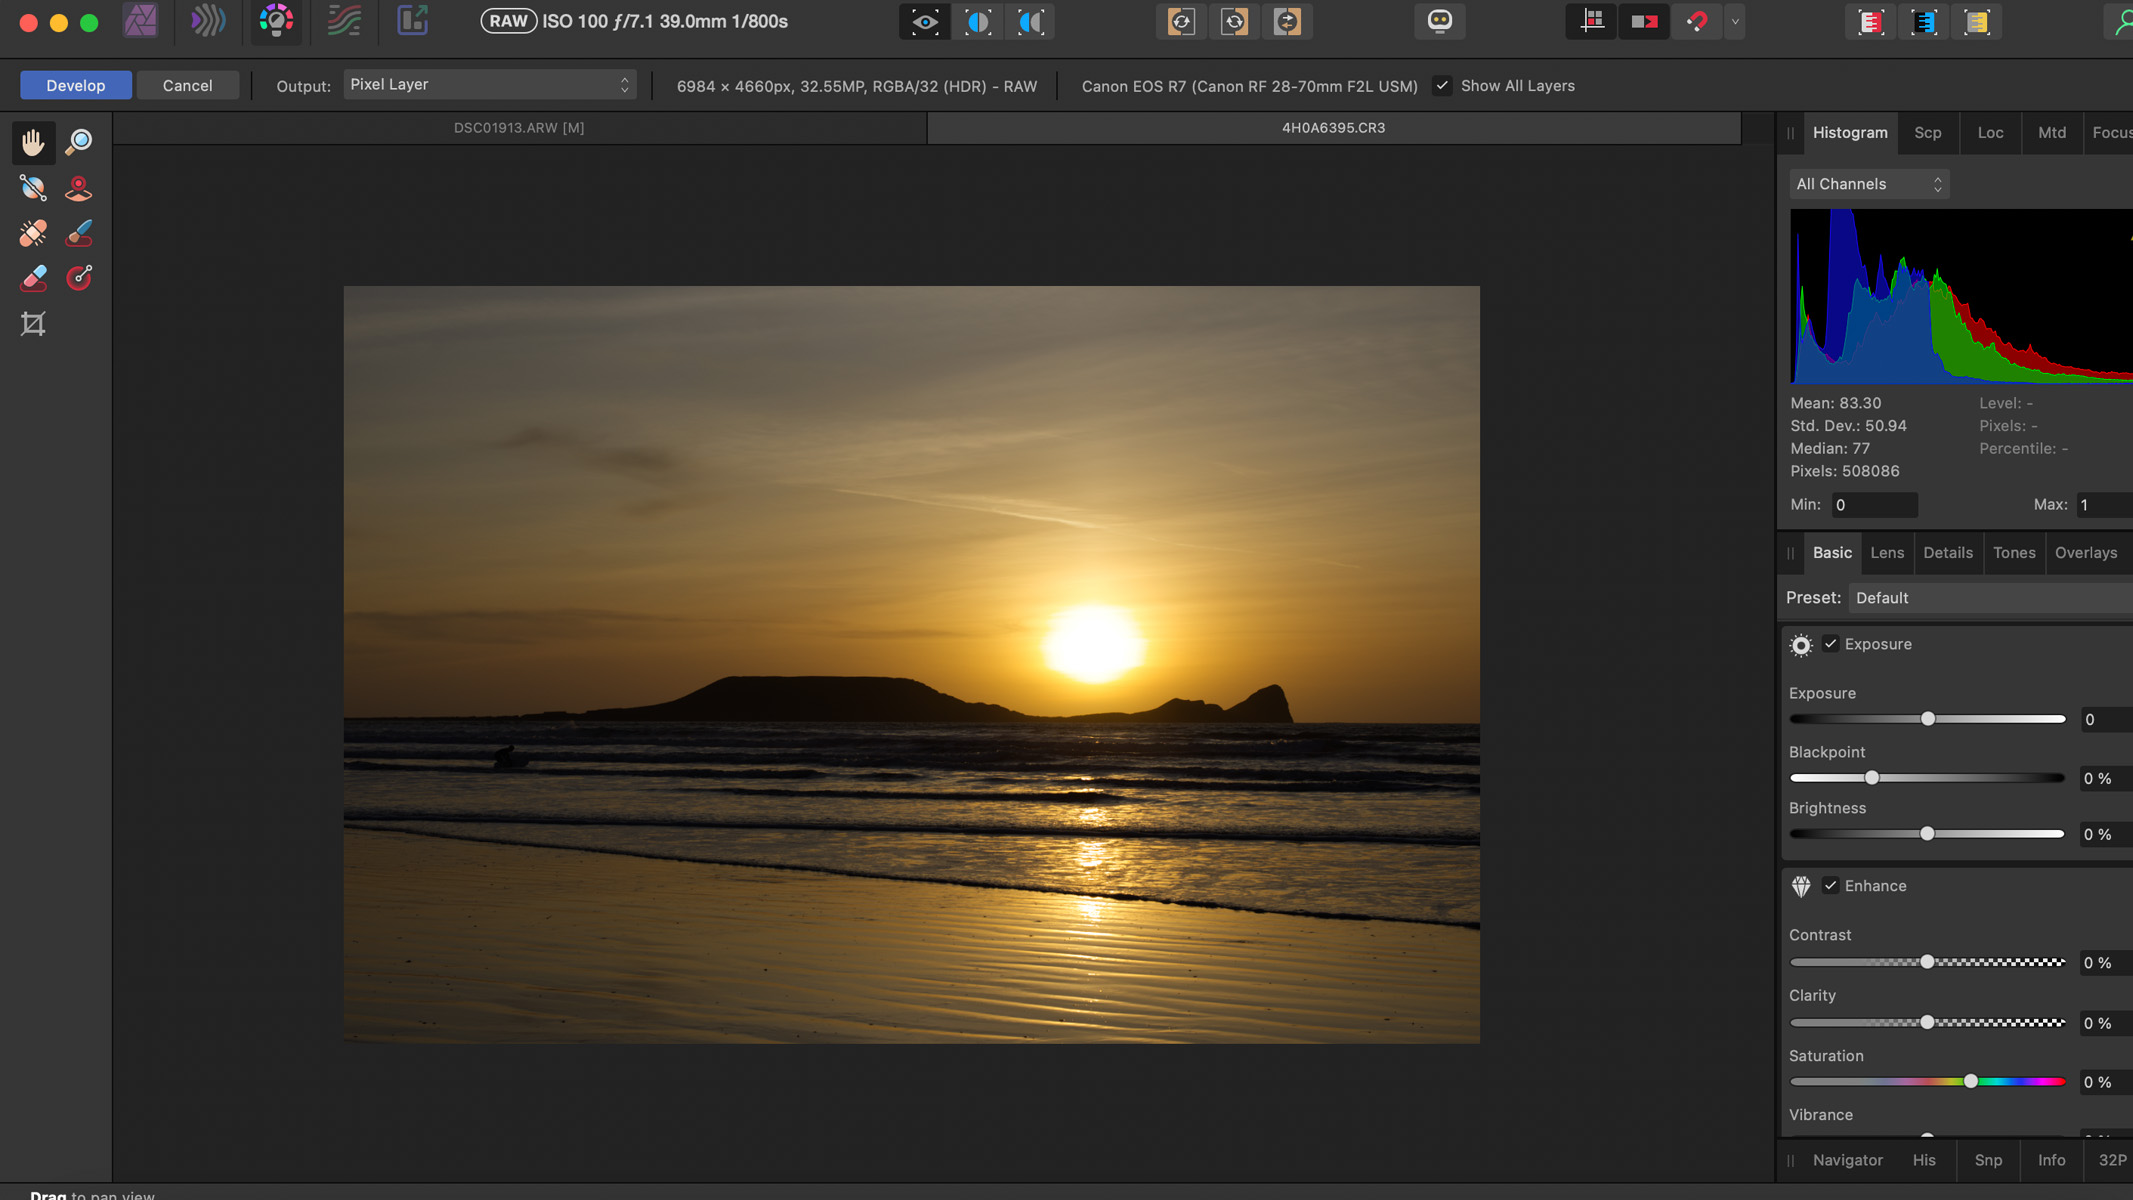
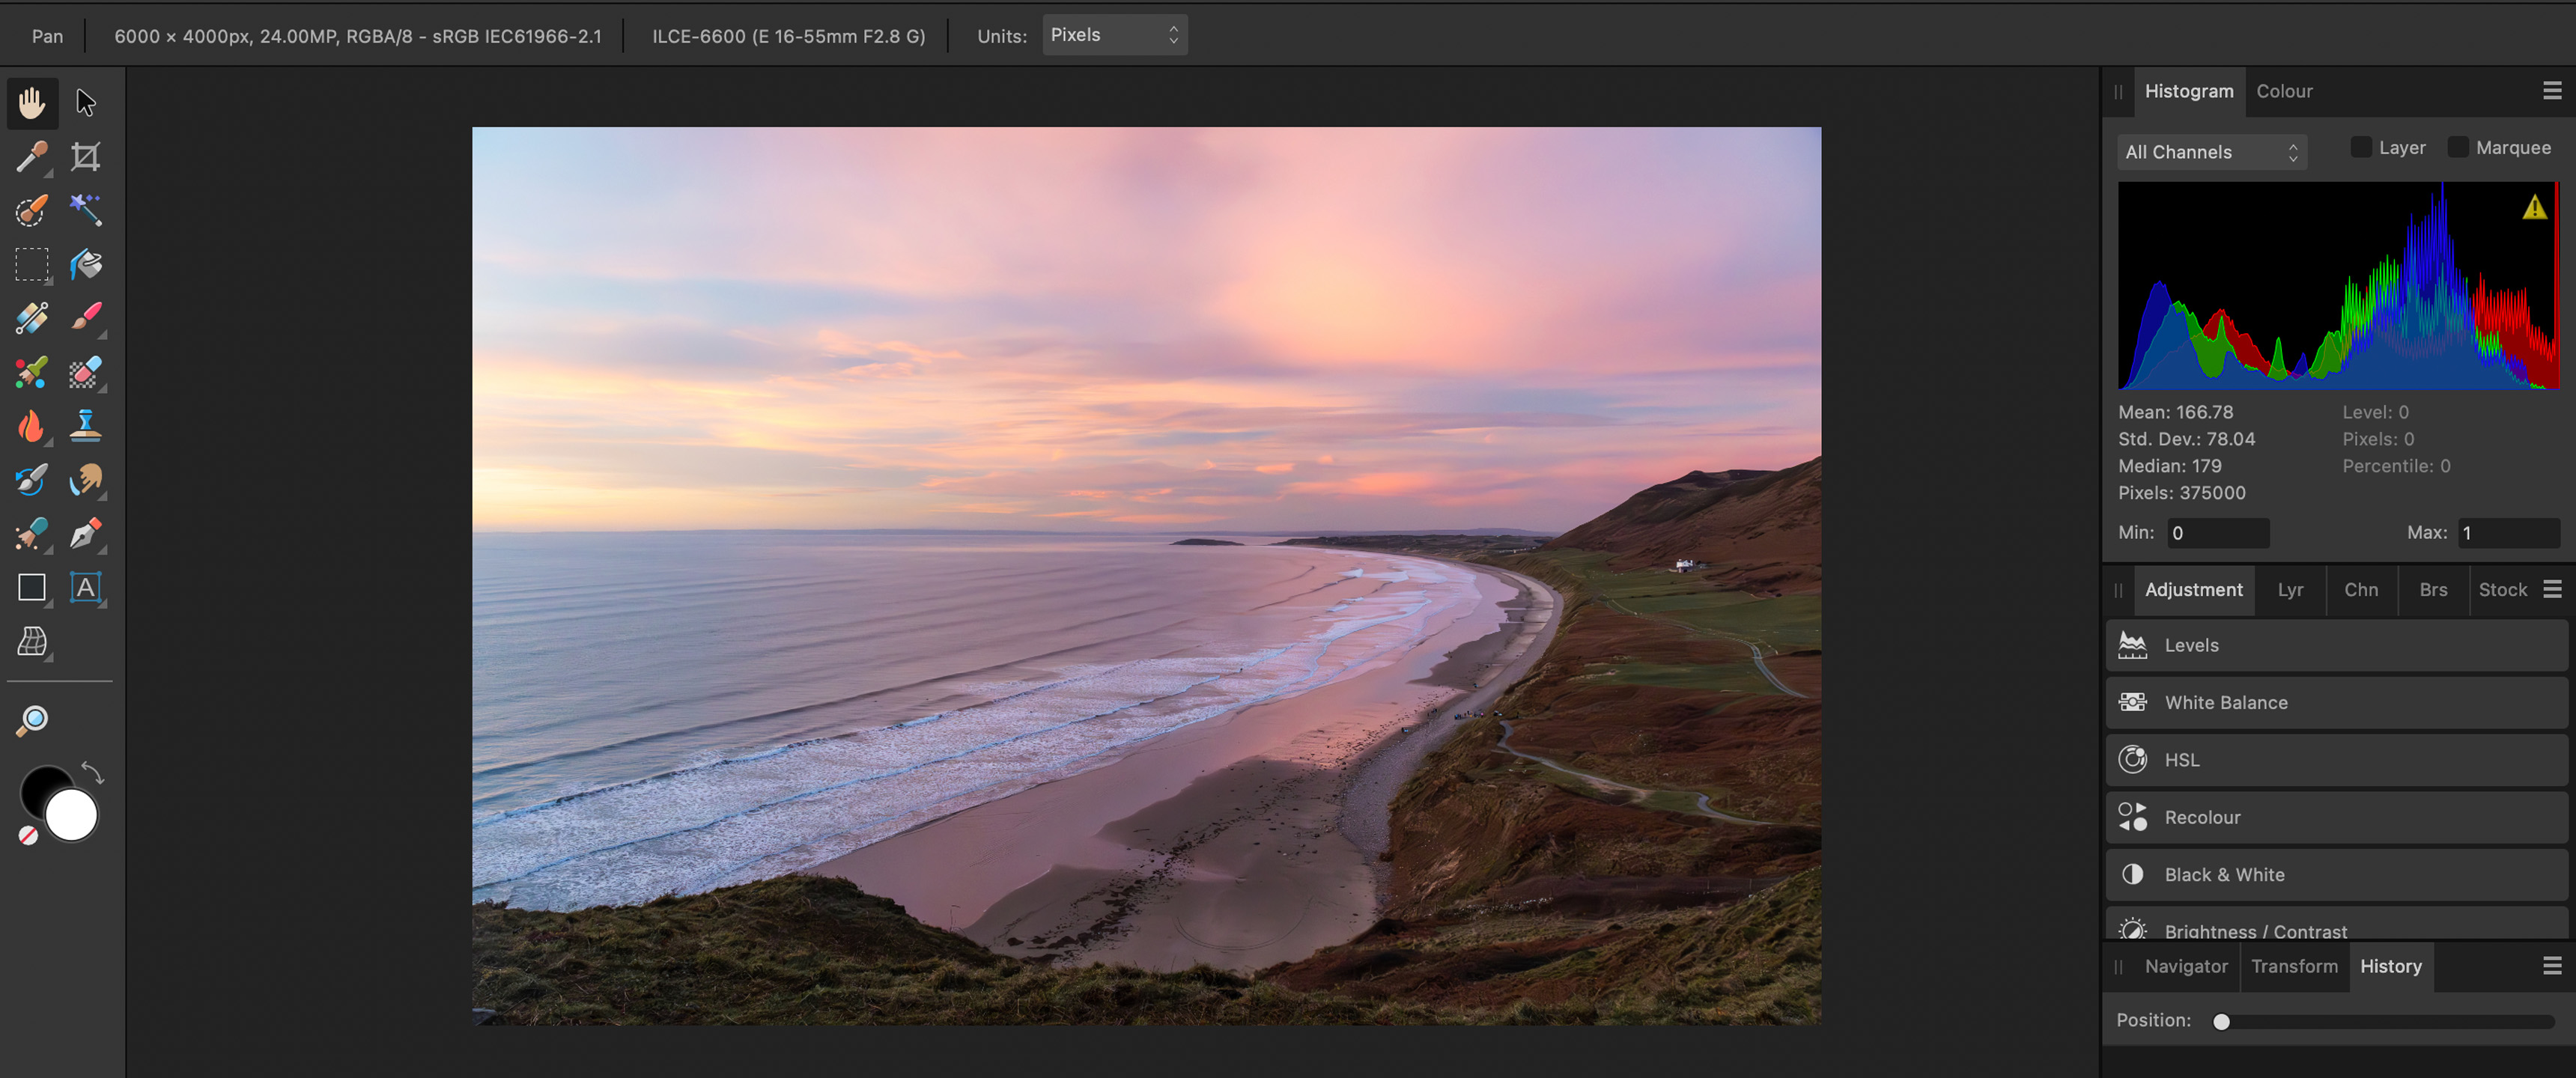
- Interface split into five different personas
- Layout not too dissimilar to Photoshop
- Will likely spend most of your time in the Develop and Photo personas
One aspect of Affinity Photo 2 that separates it from its competition is its use of personas. The personas are essentially different workspaces within the software, each having a different purpose. We spent most of our time in the Develop and Photo persona where we made initial edits to our images (like you would in Lightroom or Photoshop's Camera Raw), then once that's done you are taken to the Photo persona where you can work with masks, layers and filters — this persona is similar in layout to Photoshop. There's also a liquify persona, a tone mapping persona and an export persona.
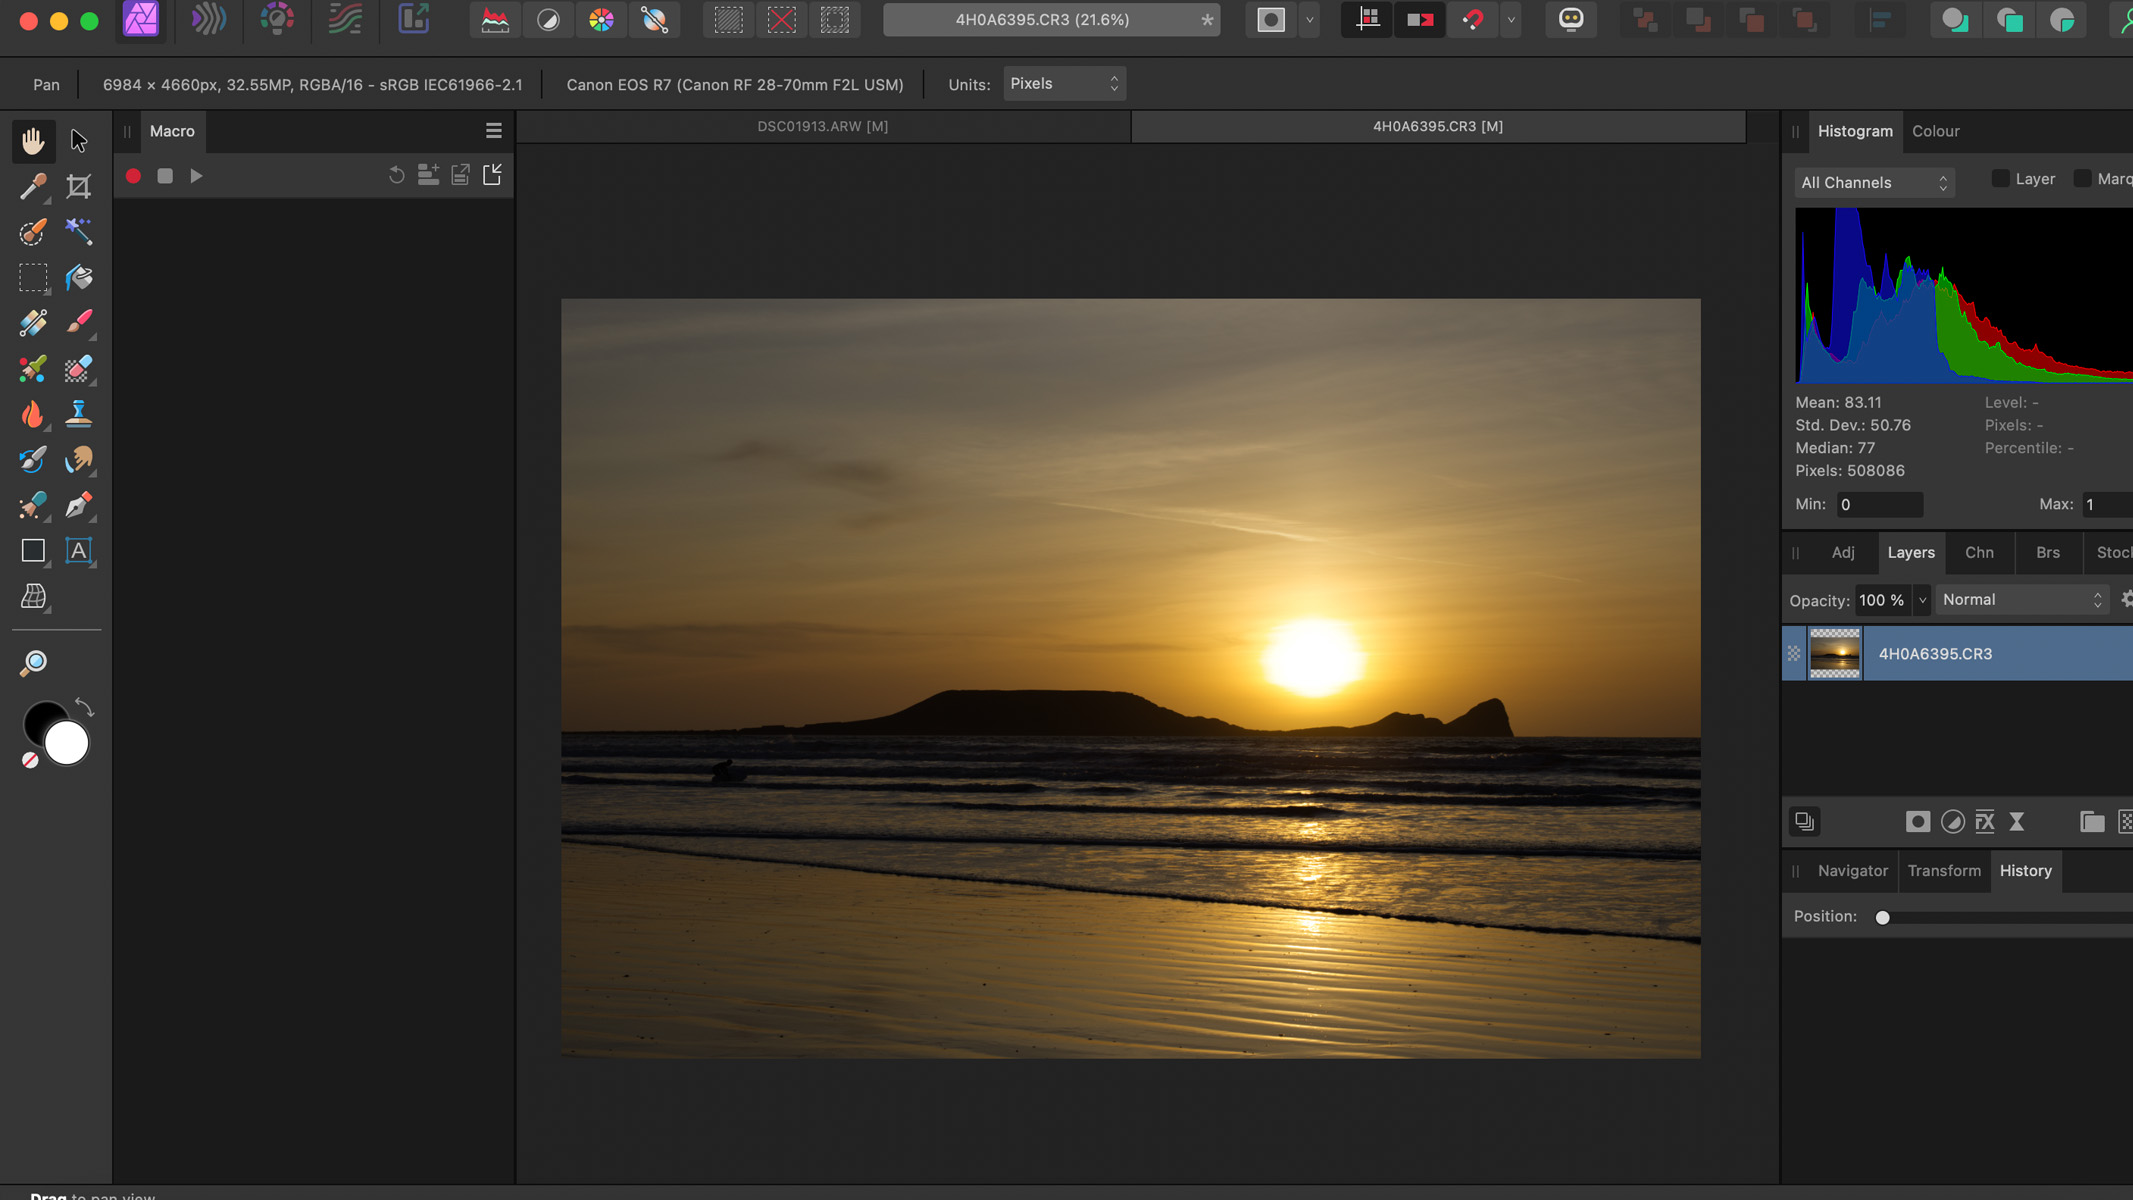
Like with any software, there is a learning curve if you've not used it before. That said, there are plenty of guides and information in the software itself, plus a plethora of tutorials on Affinity's YouTube channel, so we found it simple enough to find the information we needed when we wanted to do something. If you are proficient in Photoshop then we think you'll get along with Affinity Photo 2 just fine.
Breaking space news, the latest updates on rocket launches, skywatching events and more!
There's not much in the way of organization and cataloging in Affinity Photo 2, so you just import the photos you want to edit straight from your computer library. There are many different ways to organize your images in your own library — one of the ways we prefer is to have a main folder for the year, then split that year into four quarters, then within each quarter have another folder for the location/shoot.
We'd love to see some kind of library system in Affinity Photo 2, not only to make everything more organized within the software itself, but we think it would give Affinity an edge over Photoshop, its biggest rival.
Affinity Photo 2: Key Features
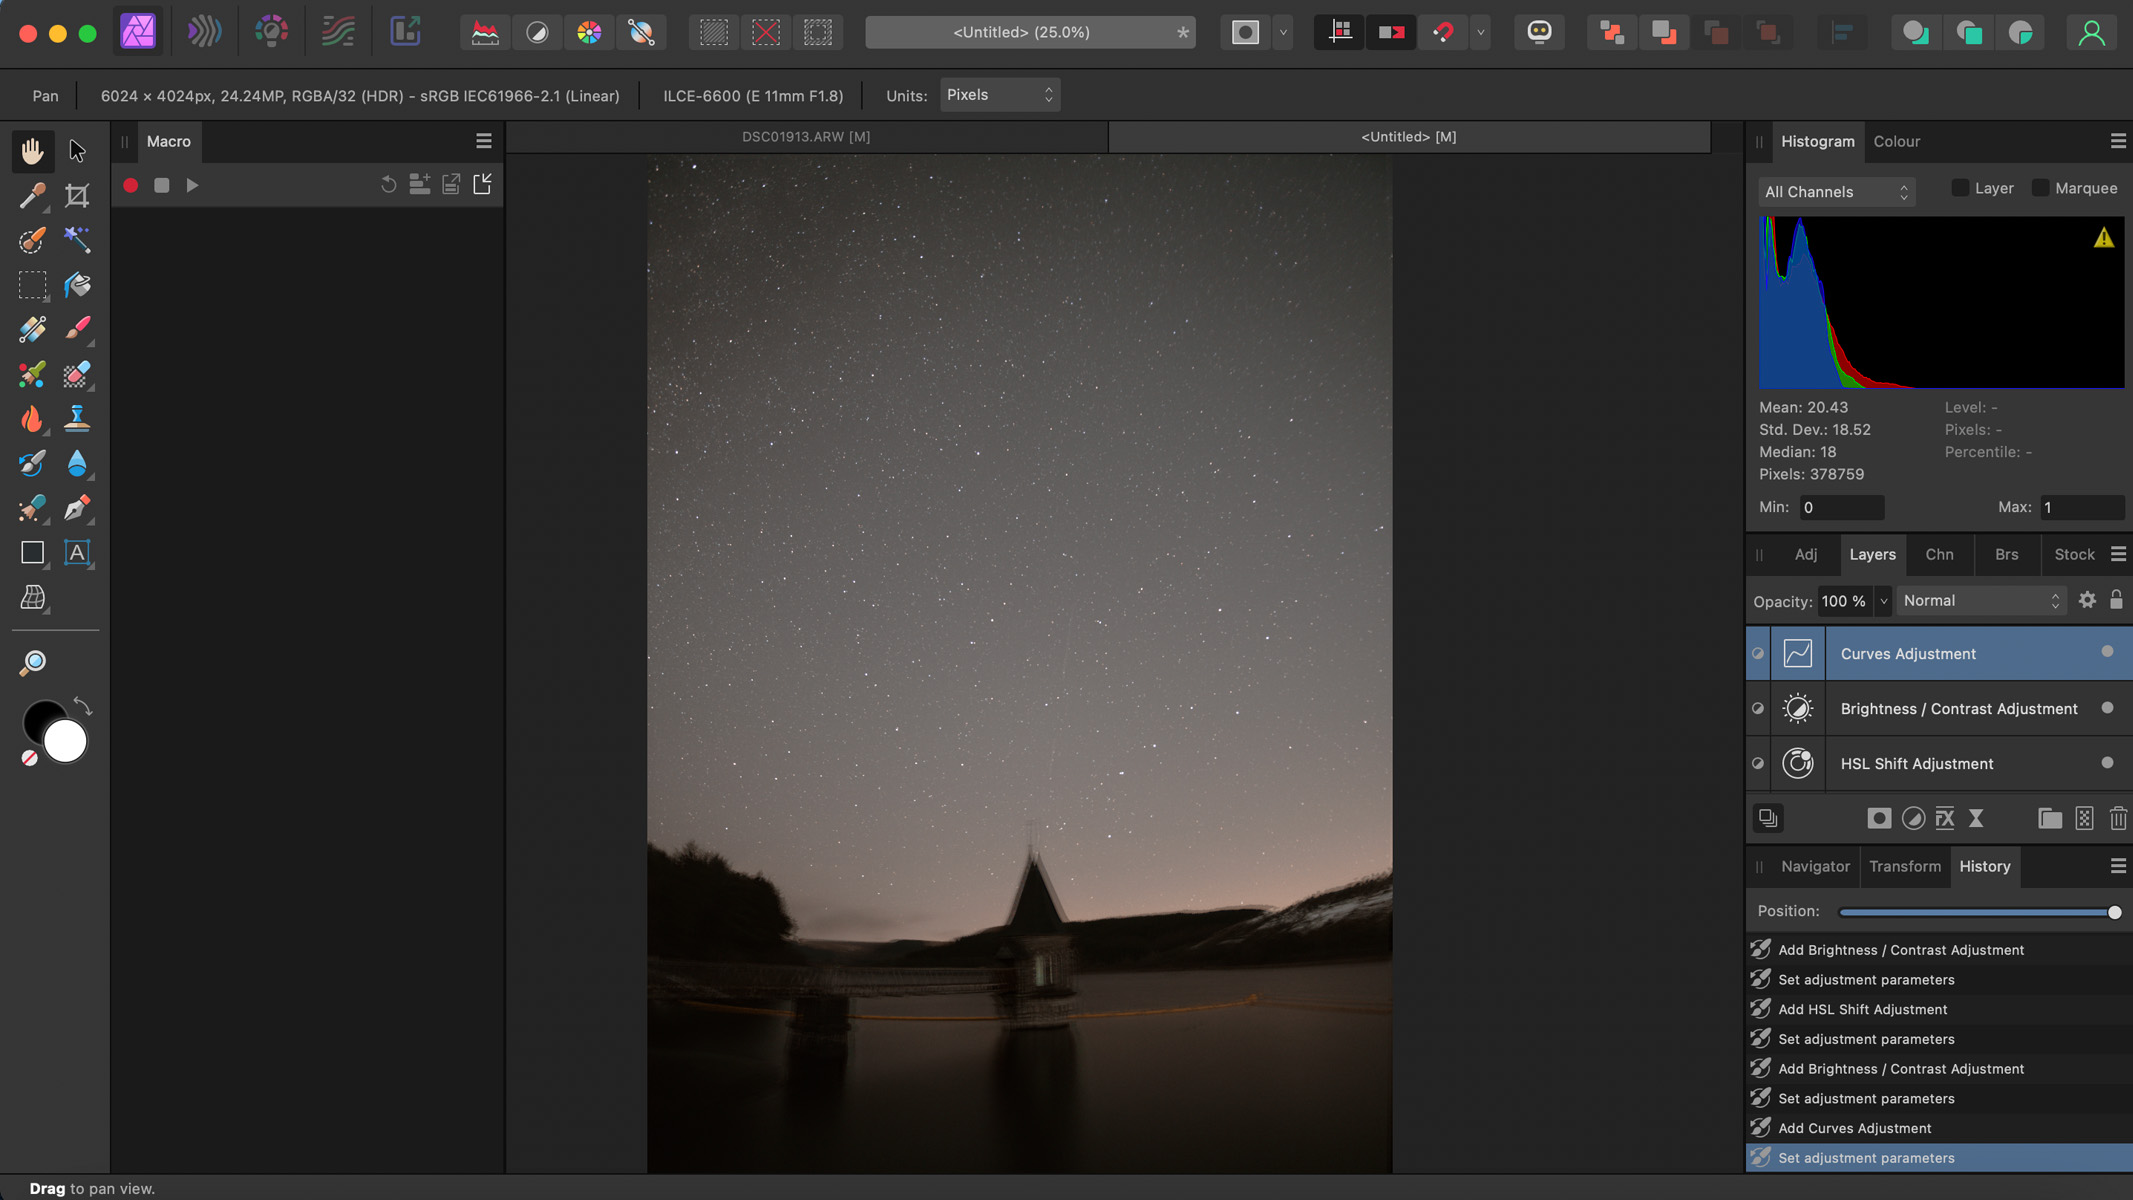
- Macros offer a convenient, time-saving solution to automate your workflow
- Now has non-destructive RAW editing
- New hue range and luminance masks work very well
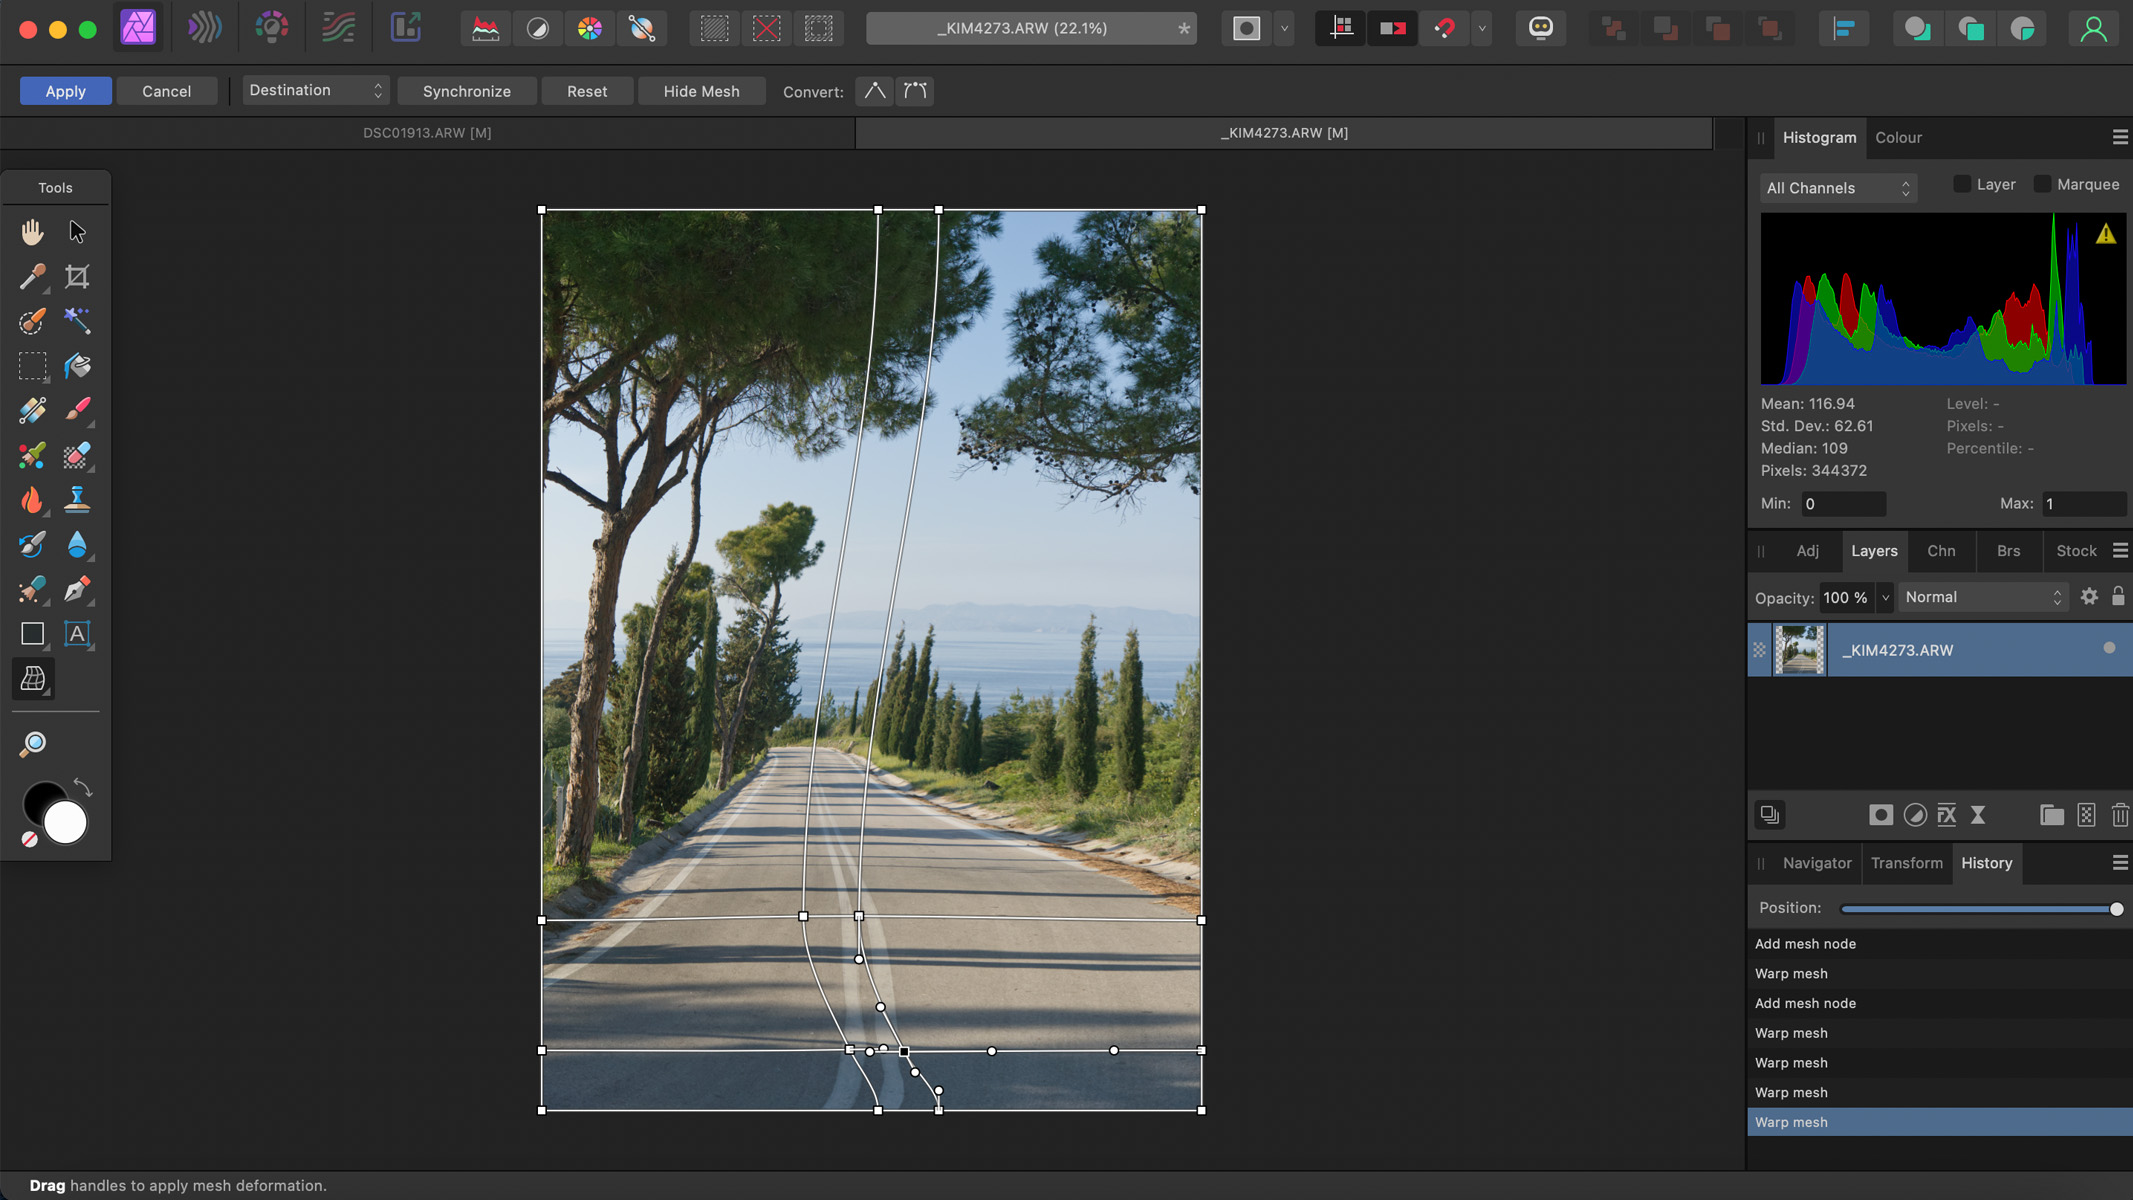
Affinity Photo 2 now features a Live mesh warp tool, a feature that wasn’t included in V1. Overall this likely isn’t going to be a feature that’s heavily used for photo editing, particularly astrophotography editing, but it’s a very useful feature for warping and distorting images to create some really interesting effects. They can be used to straighten horizons or any crooked lines in images or can be applied to portrait images to manipulate any body or face shapes.
There’s even a Repeat Mesh Warp option in the filters menu, which is great if you’re using multiple layers and want to apply the same warp to all of them.
Another great feature of Affinity Photo that we love is the Macros. A bit like Photoshop's 'Actions', and not a million miles away from Lightroom presets, Macros are a feature that allows users to record a set of steps in the photo editing or manipulation process that can then be saved and applied to other photos, essentially automating your image editing workflow.
We found that we needed to take the time to make the edits to create the macro in the first place, but it saves us from needing to do a lot of the same repetitive or time-consuming tasks on multiple photos. They can also be shared with others and it's possible to import macros, too.
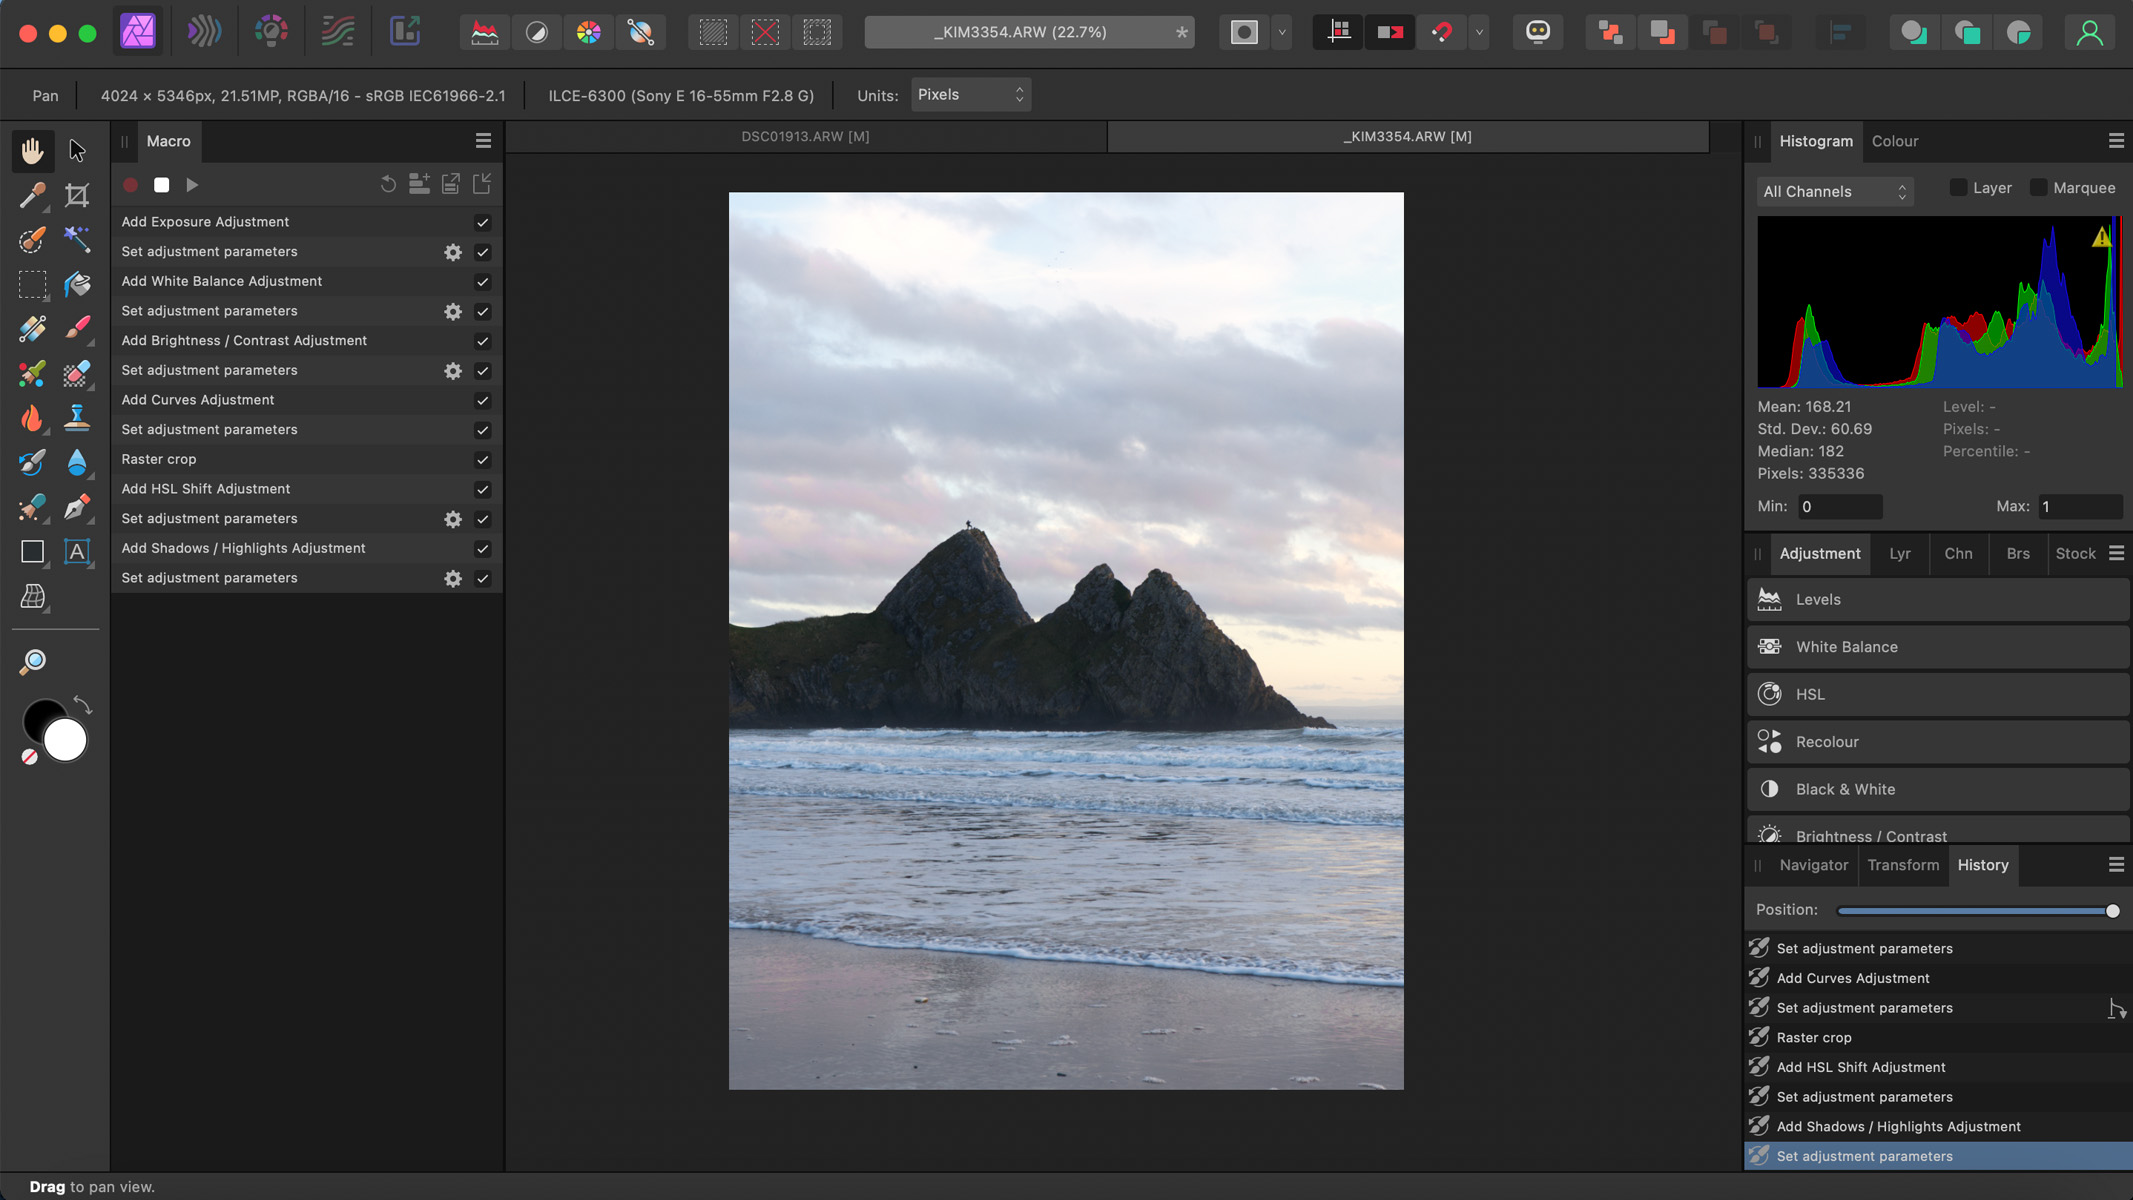
When we had a go at recording our own macro, we found it to be an incredibly straightforward process and easy to navigate for a beginner. All you need to do is click the record button in the macro panel, perform the edits, then click the stop button and save it, give it a name, and choose a category (if you want to stay organized).
There are some macros built into Affinity Photo 2 to use if you don’t want to create your own, but if you’re editing astrophotography photos, chances are you’ll want to create your own anyway as it’s more of a niche genre of photography. You can record pretty much any editing step into a macro, even live filters, although there are a few exceptions.
It's not possible to add a gradient, rearrange the order of layers, or resize an image by percentage. Even rotating an image within a macro can't be done right now, which could potentially be annoying if you shoot with an older DSLR camera that doesn’t differentiate between a portrait and landscape orientation photo in-camera.
The product expert for Affinity Photo, James Ritson, has uploaded a whole load of free astrophotography macros which we found especially beneficial when editing.
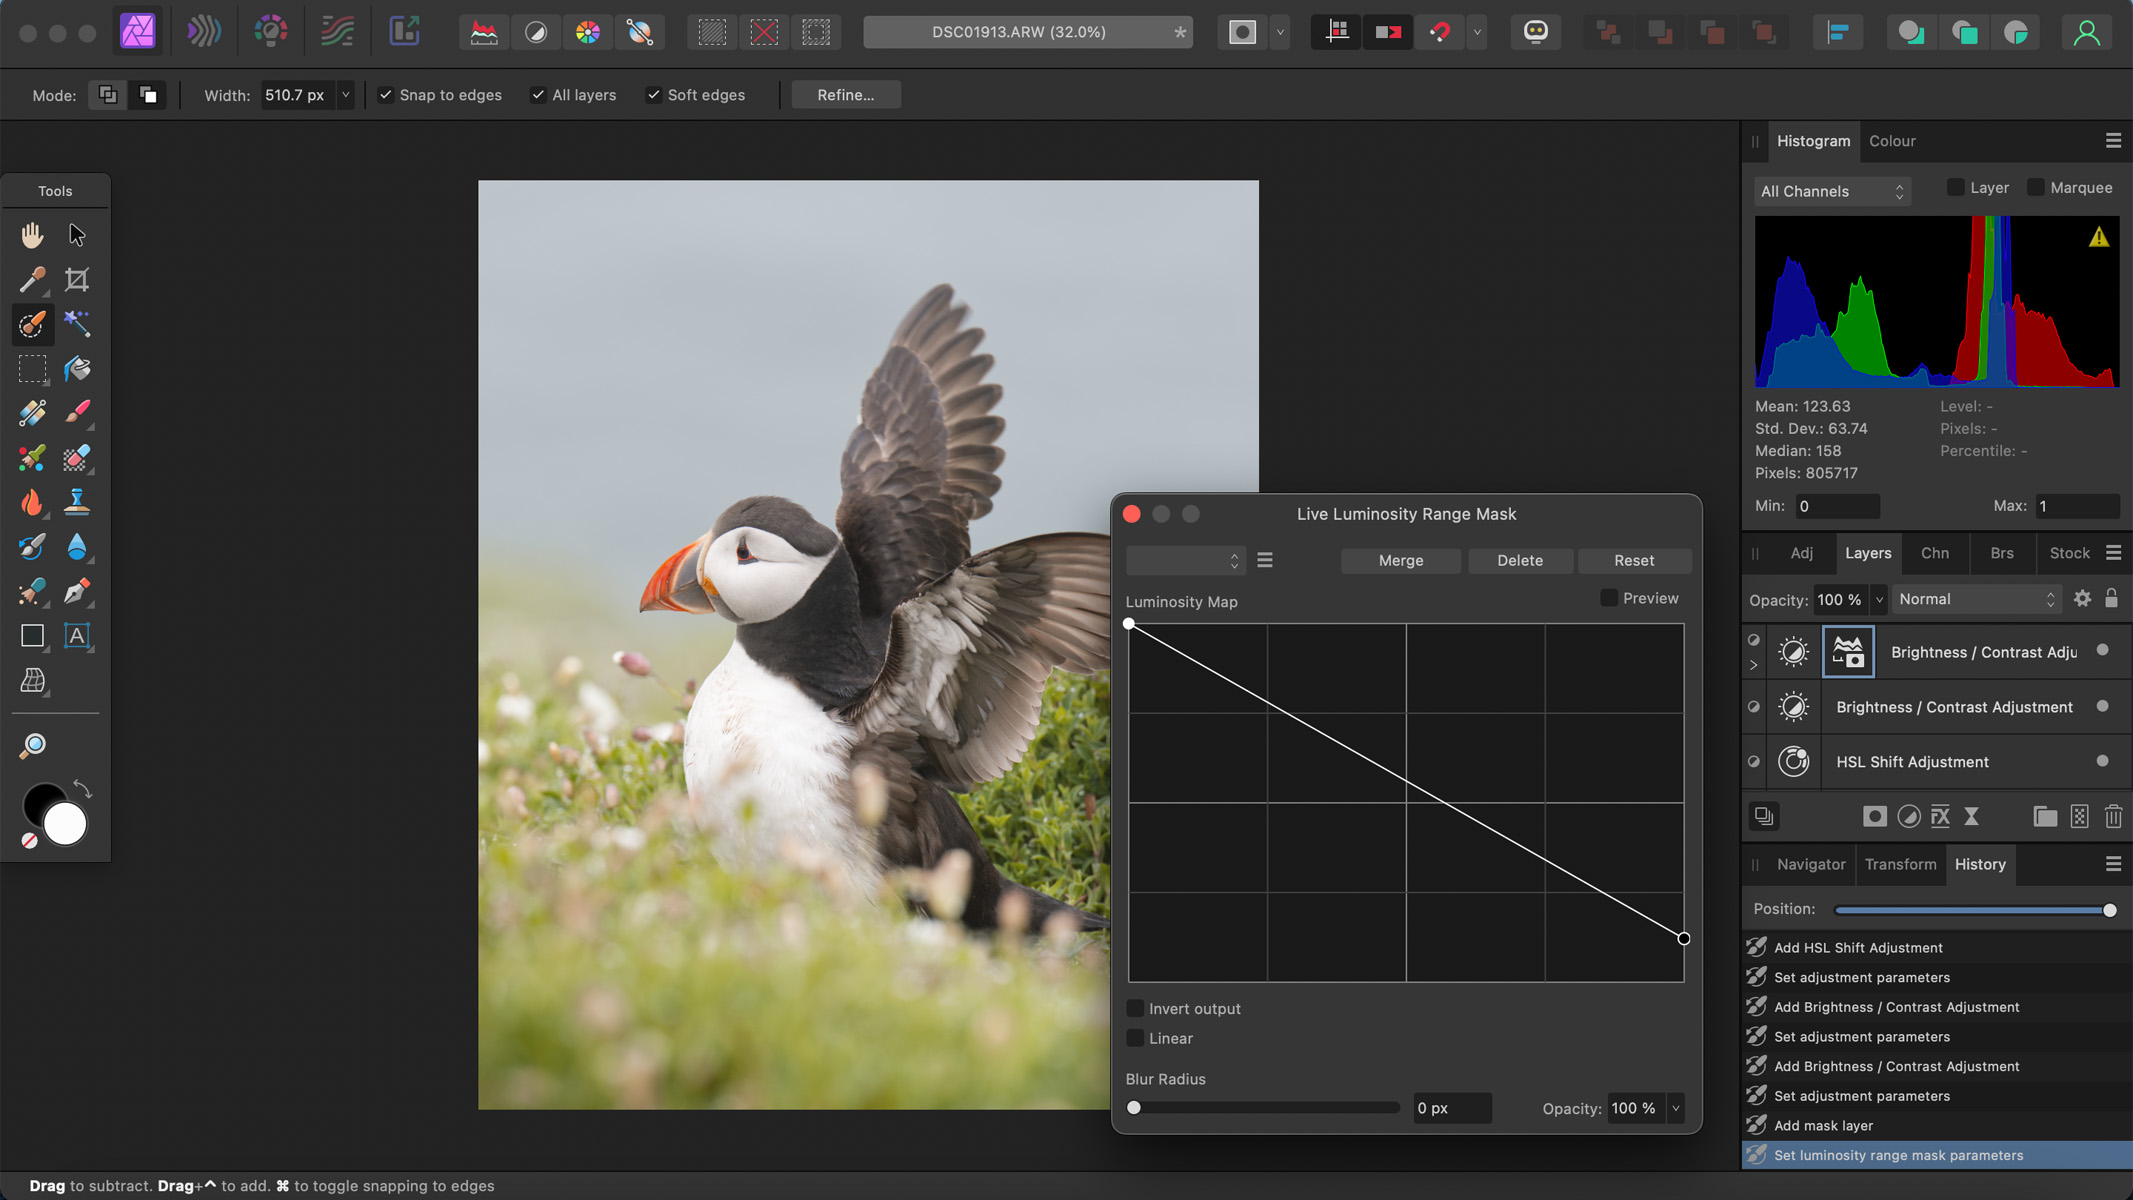
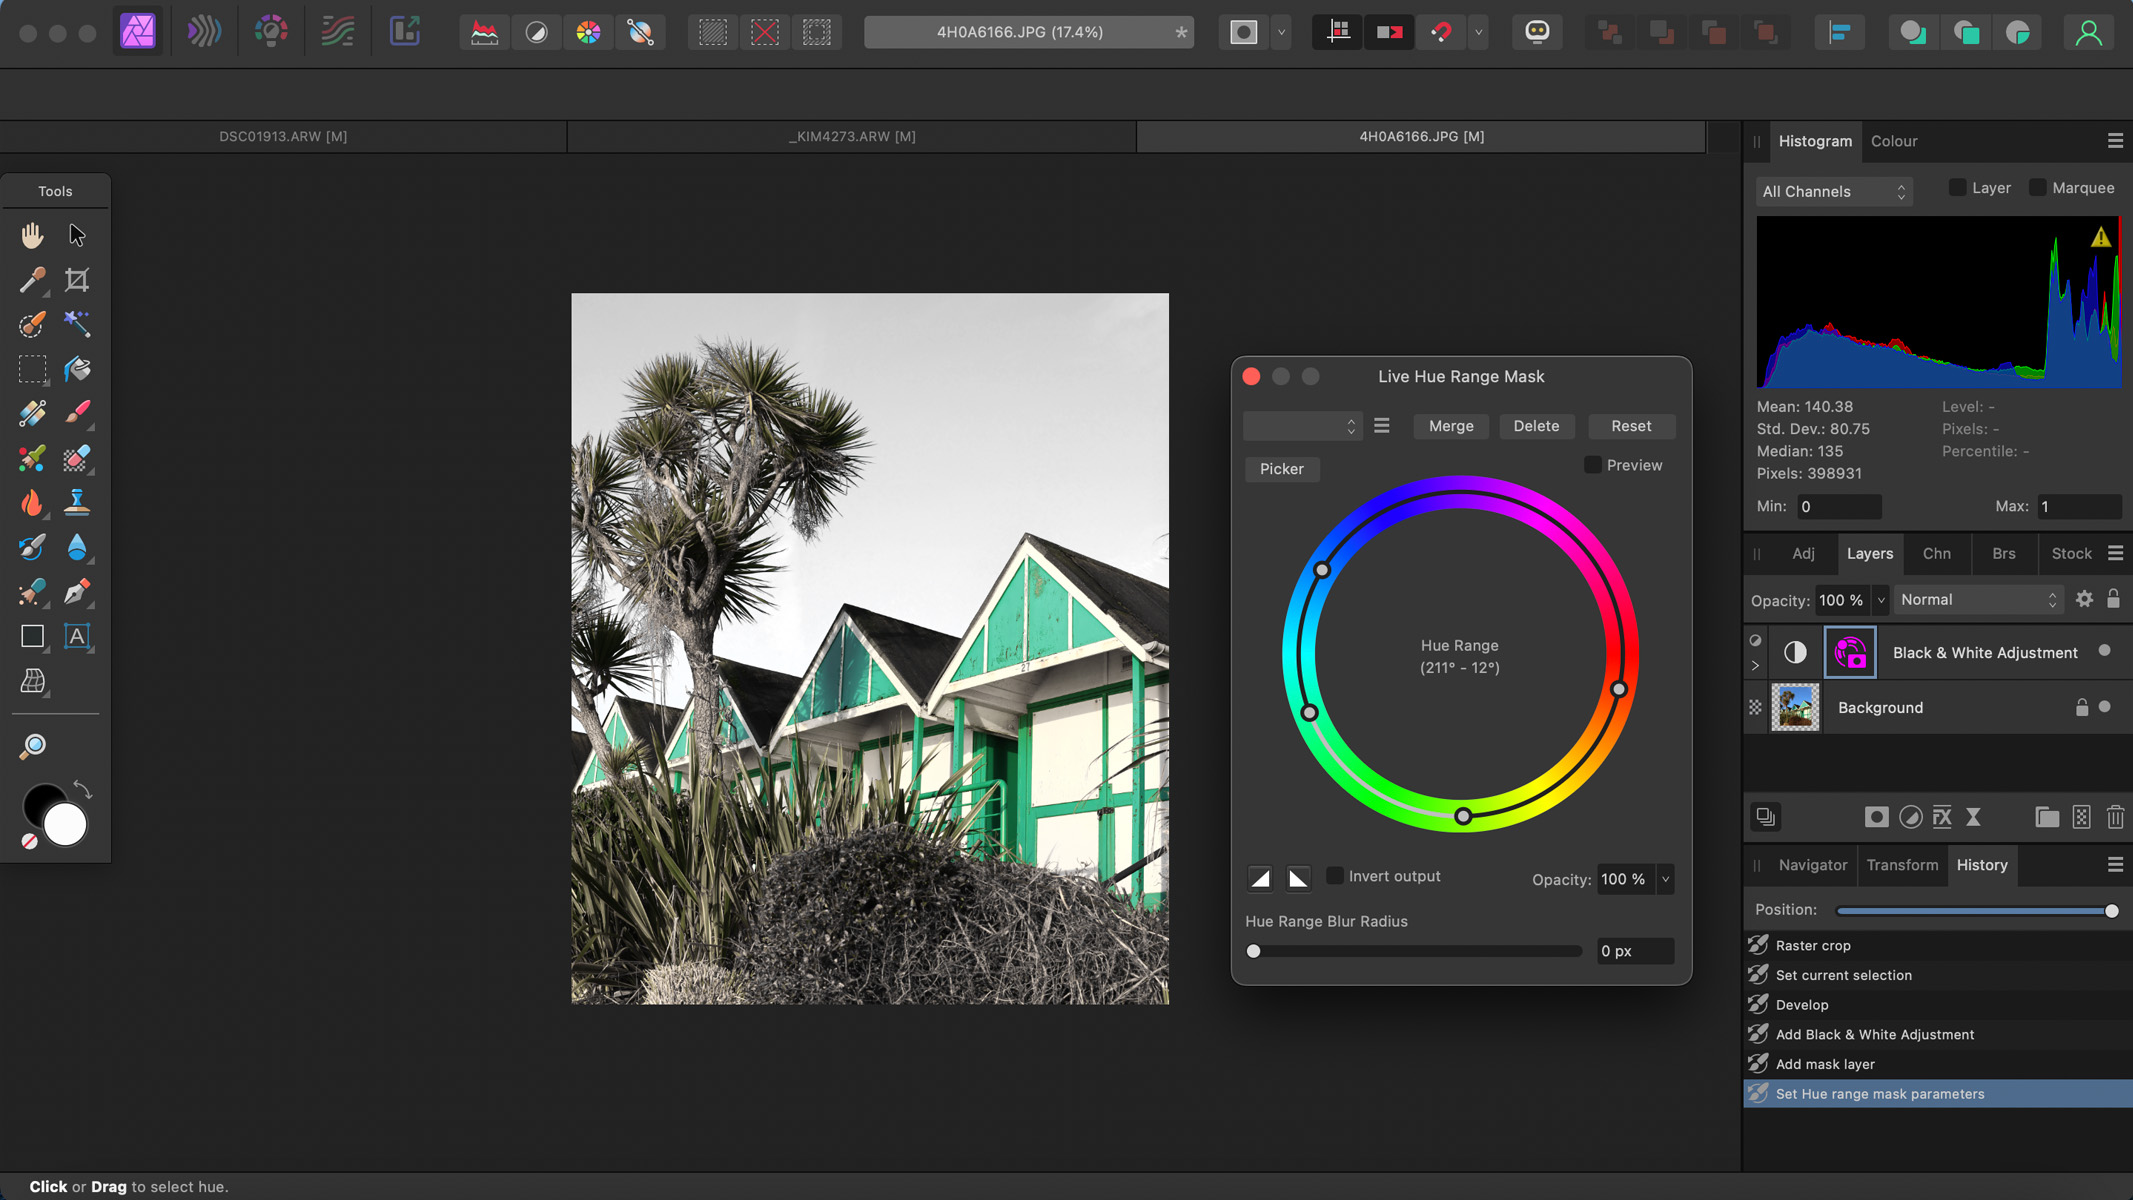
Version 2 came with some new live masks, one of which was the hue range mask. With this mask you can make adjustments to specific hues in an image, making them darker, brighter, or changing the color altogether (a really powerful tool if you do any product photography). This tool can also be used to manipulate the colors in those gorgeous deep sky images, and as these masks are non-destructive, you can easily go back and change them later on.
Another new live mask in version 2 is the luminosity mask, which works in a similar way to the hue range mask, only instead of manipulating the colors, you’re manipulating the luminance of an image. We found these masks a little confusing to begin with so we’d recommend experimenting with them a bit until you get comfortable. The Affinity Photo youtube channel has many tutorial videos to help with this.
Live filters are an incredibly powerful tool and a big player in maintaining a non-destructive workflow within Affinity Photo 2. Think of live filters like adjustment layers that apply filters instead of your regular adjustments. They also have built-in masks, so let’s say you have a portrait and you want to blur the background more — you can add a Gaussian blur live filter, then use a mask to bring the person back into clarity. But if you decide there’s too much blur, thanks to the live filters being non-destructive, you can easily go back to the Gaussian blur live filter and reduce it and see the results in real-time. Live filters could be great to use in astrophotography editing, they could be used for star reduction or glow, sharpening, luminance and color noise reduction — the list goes on.
Affinity Photo 2: Astrophotography Features
- Astrophotography stacking tool is very accurate
- Remove background tool brings dark skies back to black
- Gets confused if you try to stack images with the sky and foreground
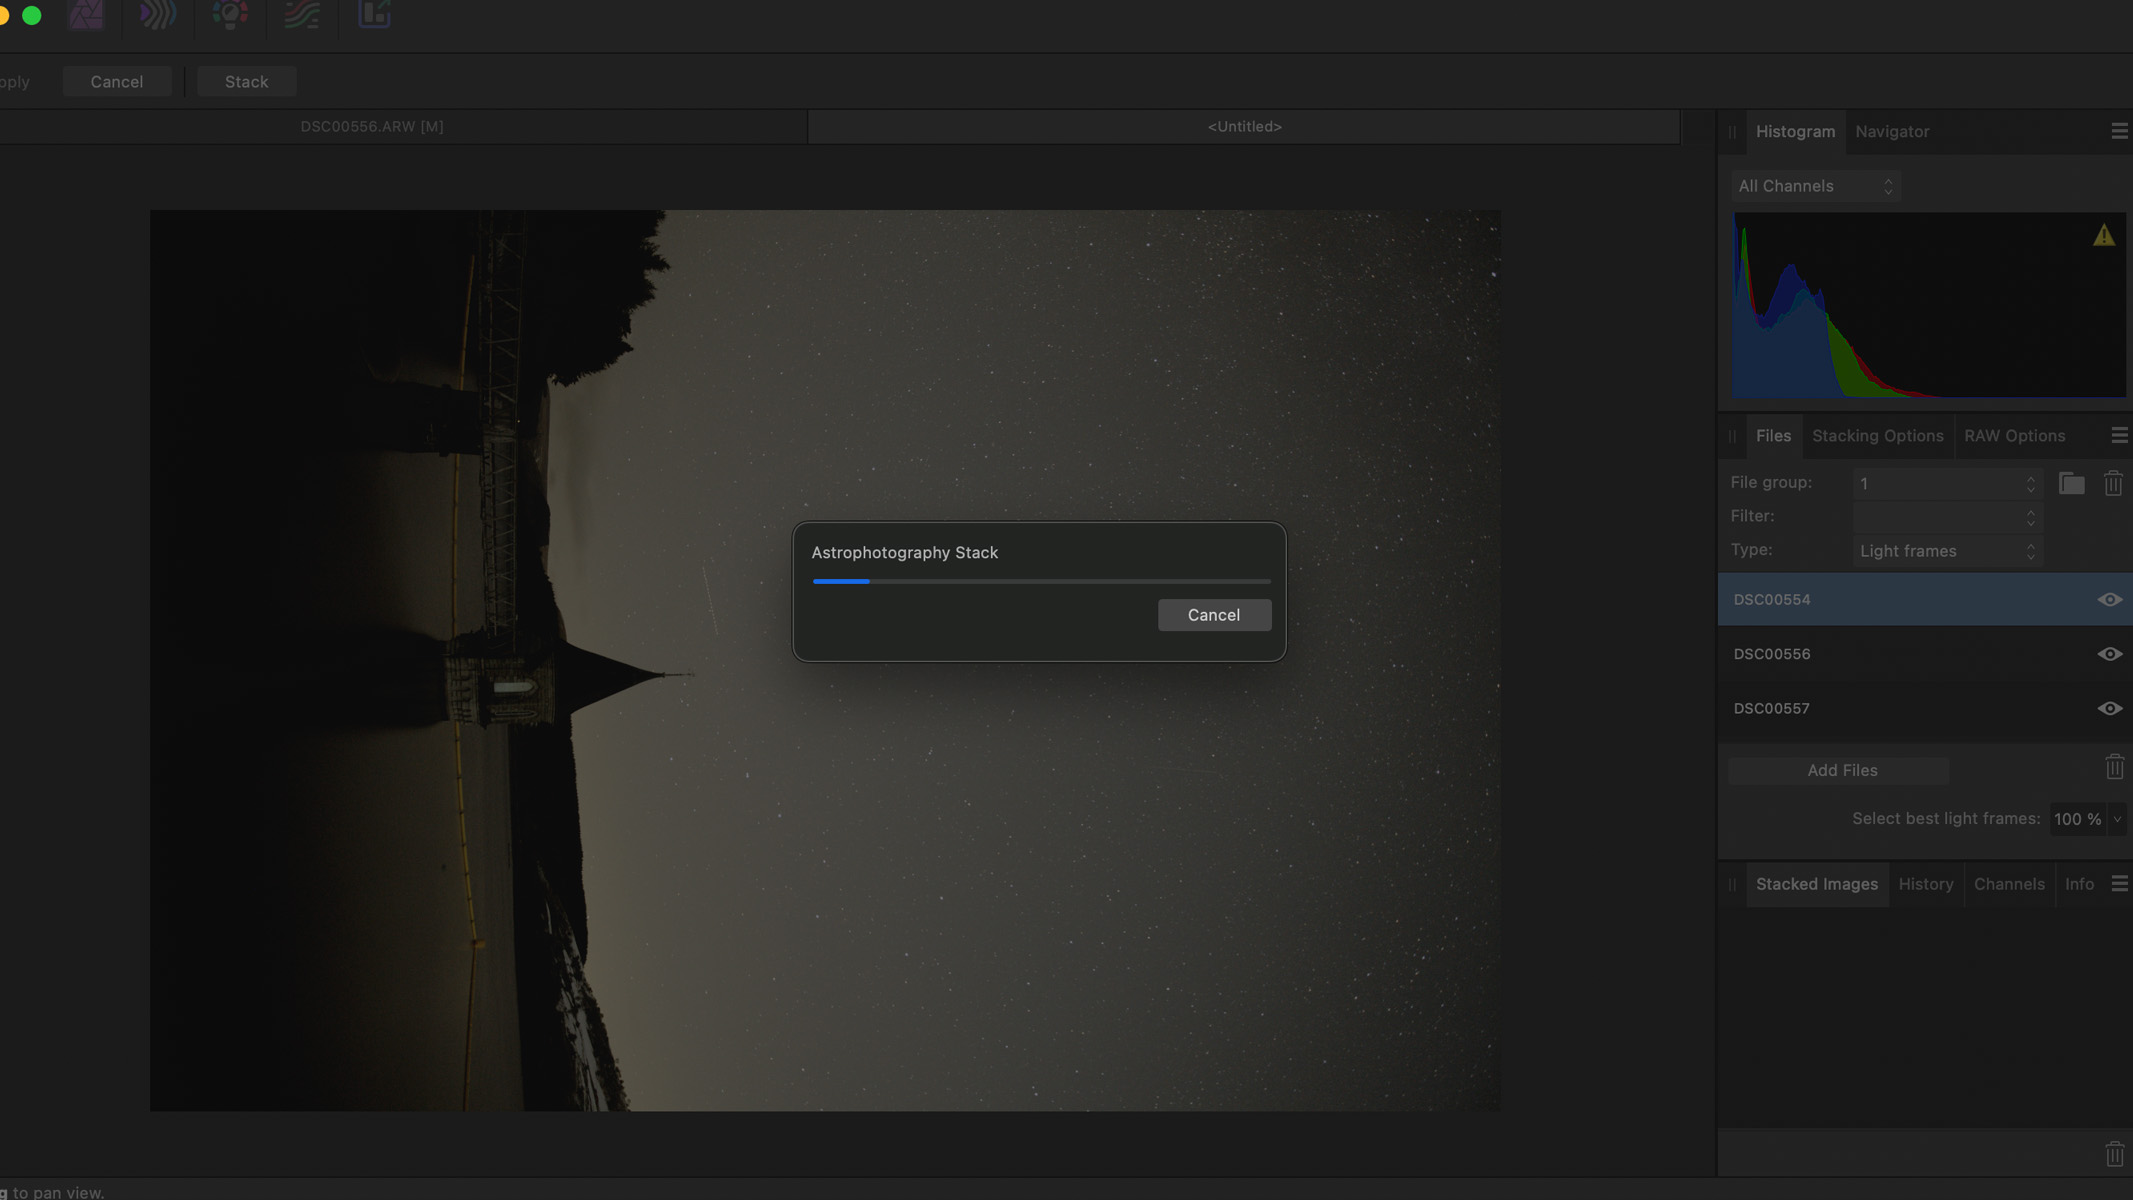
One astro-specific feature of Affinity Photo 2 that we enjoyed is the Astrophotography Stack persona. Having had issues with stacking in our Adobe Photoshop review 2023, we were intrigued to see how Affinity Photo 2 would handle an Astro image with stars and foreground.
We stacked a few light frames with one dark frame and Affinity Photo 2 actually performed surprisingly well. The software prioritizes aligning the stars rather than aligning the foreground, so we found that all of the stars throughout the frame were lined up perfectly, but the foreground was out (as opposed to Photoshop where the foreground was aligned but the stars weren’t).
Some in-depth astrophotographers and astro editors may replace the foreground anyway though, so this isn’t too much of an issue. This also won’t be a problem at all though if you’re taking exclusively sky images with no foreground, such as nebulas or constellations. Its ease of use and impressive results will definitely make Affinity Photo 2 very attractive to astrophotographers.
While many aspects of Affinity Photo involve somewhat of a learning curve, using the astrophotography stacking tool is very straightforward and easy to get to grips with, even for a beginner. It's essentially a case of adding in your photos, clicking 'stack', and it’s done.
There are options to add light frames, bias frames, dark frames, dark flat frames and flat frames (and you can add as few or as many as you like), so there’s room in Affinity Photo 2 to really produce some super detailed Astro photos.
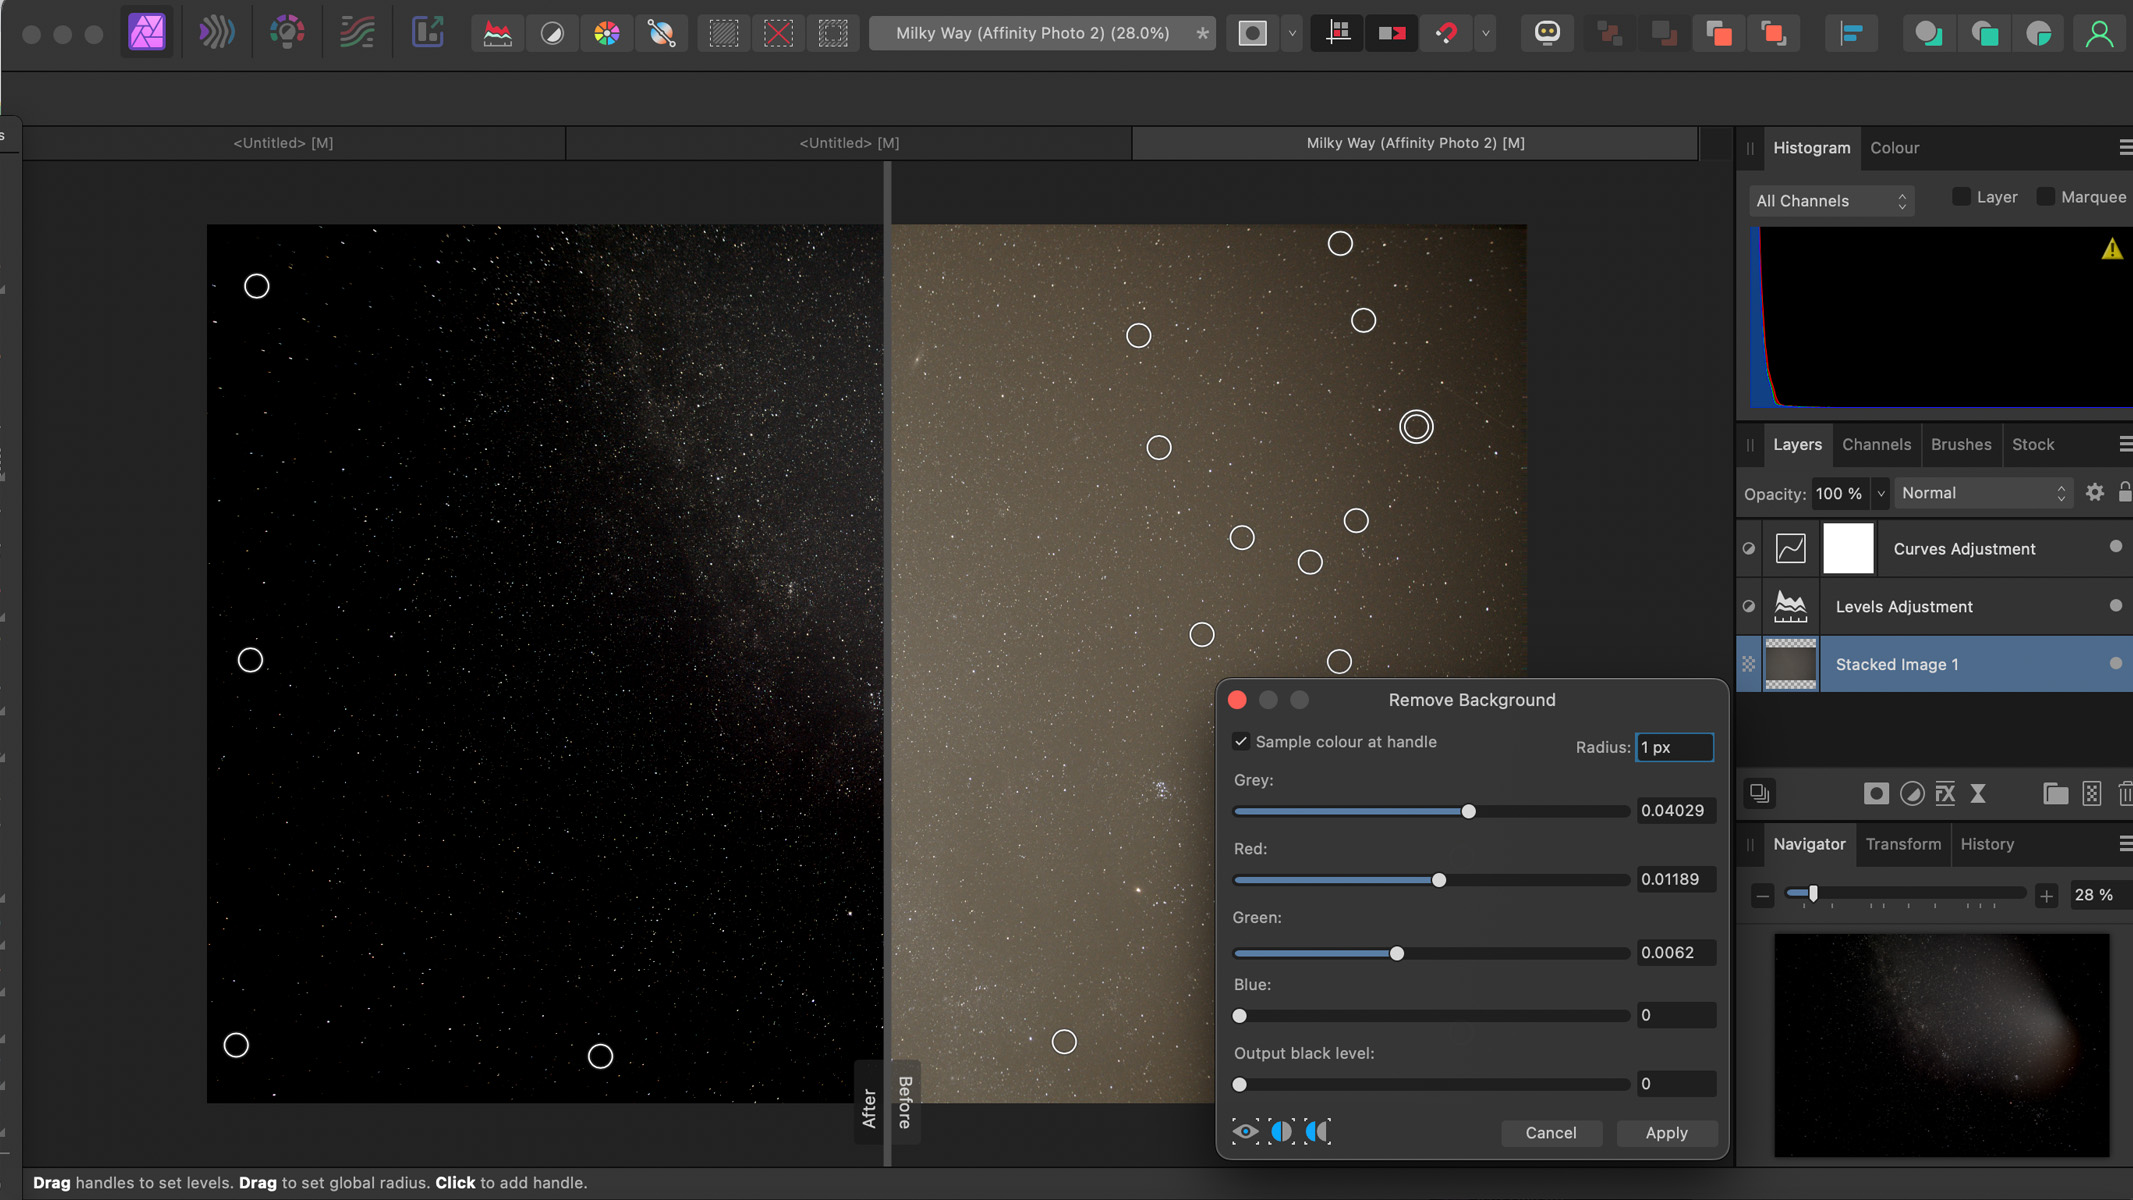
We also really liked the Remove Background tool for astro photos — you just move the sampler to a background area of the image and it’ll use AI to remove the background and any color casts, making the dark skies even darker.
Should you buy Affinity Photo 2?
If you're looking for an affordable alternative to Photoshop, then look no further than Affinity Photo 2. It does have its drawbacks, like not being available as a mobile app except on iPad, no integration with social media and no way of creating a contact sheet, but as V1 had so many updates since its release, there's definitely scope for Serif to include these in future updates over time.
We think Affinity Photo 2 would be a great option for Astrophotographers specifically with its dedicated Astrophotography stacking tool and the remove background tool, making image stacking a breeze. While it's not as robust as Photoshop, it can absolutely satisfy your image editing needs and provide you with some beautiful results.
If Affinity Photo 2 isn't for you
The obvious rival to Affinity Photo 2 is, of course, Adobe Photoshop. The global mainstay of image manipulation, Photoshop is seriously hard to beat, and if you'd rather use software on a subscription basis rather than pay for a universal license while gaining access to all the professional industry-level editing tools, Photoshop will likely be the one for you.
Corel Paintshop Pro could be an option to consider if you're looking for a beginner-friendly program with a broad range of tools that will be easy to grow and learn with. It's not as advanced as Adobe or Serif, and it only works with Windows, but it features some excellent AI editing tools and won't overwhelm you with confusing interfaces and has three separate workspaces. Like Affinity Photo 2, Corel Paintshop Pro is subscription-free.

Kimberley Lane is a landscape & seascape photographer living in South Wales. Originally using photography as a way to cope with health issues, she aims to portray a feeling of calm and peace through her images. Her work has been featured in a number of national photography magazines.
