Build Your Own Planetarium | Science Fair Projects
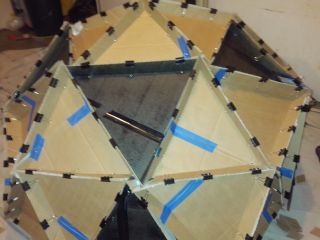
Editor's note: Contributor Nola Taylor Redd enlisted her children — Dawn (12), Michael (10), Jimmy (8) and Candy (6) [the younger two were primarily clipping pieces together] — for this project. Here is her first-person account of the process. The project took them approximately six hours to complete.
Teaching children about the stars can be fun for both the instructor and the students, but getting a group to a full-scale planetarium can be a challenge. How about building your own instead?
You can construct a simple planetarium from cardboard, and the methods are basic enough that your students can be involved in the project. Depending how permanent you intend your structure to be, you can easily break it down and reassemble it.
Materials needed
Corrugated cardboard — lots of it
Ideally, you want to be certain that the cardboard does not have cutouts in the side. Some of our boxes came from a large supply store (as we were also moving at the time), and had sections removed for easier folding. This necessitated plugging the holes with heavy tape. Corrugated cardboard is better than regular cardboard, as it provides more strength to the structure. Fiberboard for science fair displays is also an option for smaller domes, but larger domes require corrugated cardboard.
You will want the interior of your planetarium to be white, so if you can obtain cardboard that is white on one side, this would be ideal.
Binder clips or nut-and-bolt assemblies with washers
Choosing between binder clips or nuts and bolts depends on how easily you want to break apart and reassemble your project. Nuts and bolts will provide more structural stability, but binder clips will allow you to take the planetarium apart and store it more easily. You will need 225 to 300 regular-size binder clips (3 to 4 per joint), or 300 three-quarter-inch nuts and bolts and 600 washers, depending on your decision. We used binder clips, which was the most expensive part of our project.
Cutting tool for the cardboard
We used the single blade of a pair of scissors for scoring, because it only cut the cardboard on one side, and used an X-acto knife for cutting completely through the cardboard. Scissors are not recommended for corrugated cardboard, as it will be a significant challenge to cut.
Ruler or meter stick
Measure twice, cut once!
Wooden knob
Something to use to open the dome's door.
Choose a size
The most important decision that you will make will be what size of the planetarium you wish to build. A dome that is two meters (6.5 feet) across will allow a small number of students inside; we housed four children and one adult but it was tight. A 5-meter (15 feet) dome will allow significantly more students, but will also take up more space.
Create components
Step 1: Make dome panels. Our planetarium was designed as a geodesic dome using a series of interconnected triangular panels. It required two different sizes of triangles. Make a template of each size to be traced, so that all similar triangles are the same size.
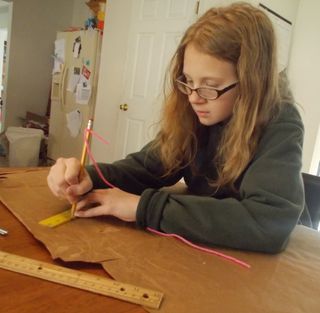
To simplify the creation of your template, you can create an extended compass. Measure the base of your triangle. Then tie a string to a pencil and cut it to the length of the remaining sides. Pin one end of the triangle to the end of your base and draw an arc near the top; do the same with the other side. Where the arc crosses is the meeting point of your triangle; draw the sides accordingly.
The first triangle (Triangle A) is an equilateral triangle, which has three equal sides. For a small dome, each side is equal to 61.8 centimeters (24.33 or 24⅓ inches). Larger domes require triangles with sides of 154.5 cm (60.83 or 60⅚ inches).
The second triangle (Triangle B) is an isosceles triangle, which has two equal sides. The single side will be the same length as the equilateral triangle — 61.8 cm for the small dome and 154.5 cm for the large one. The two identical length sides will be slightly smaller, at 54.6 cm (21.5 inches) for the small dome and 136.5 cm (23.88 inches) for the larger.
I highly recommend double-checking the size of your template prior to cutting out your triangles. We didn't, and as a result, we burned through a significant amount of cardboard. The most important element is to make sure that the third side of your isosceles triangle matches the length of your equilateral triangles.
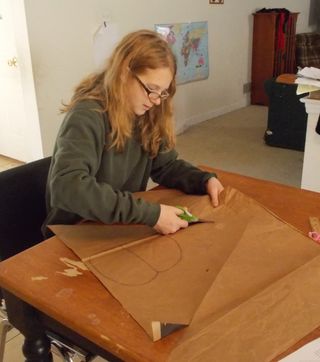
Step 2: Use the template to cut out your triangles. You will need 10 equilateral triangles (Triangle A) and 30 isosceles triangles (Triangle B). To help keep count, we recommend labeling the outside-facing side of each triangle with the appropriate letter and number (A1, B29, etc). We also suggest labeling your B triangles so that the odd side is facing down; this makes it easier to locate that side while assembling the dome. If you have cardboard or fiberboard that is white on one side — which will be on the inside of the dome — make sure that you label the other, outward-facing side.
Step 3: Cut out parts for the base. You will need 10 rectangles, with the top measuring the same length as the side of your equilateral triangle (61.8 cm for the small dome and 154.5 cm for the large one). Set the height to be the desired height of your planetarium, no higher than a meter.
Select one of your rectangles to contain the door. Cut out a rectangular door around the interior of this base piece. Attach a wooden knob to a piece of cardboard cut slightly larger than the door, then glue the larger piece to the door panel. The extra cardboard will serve to block light.
Step 4: Cut flaps on the panels. You will need to cut 5-cm (2-inch) flaps on the outward-facing side of each triangle. We used one side of a pair of scissors to score the cardboard. You can also use a heavy ball-point pen to weaken the bending joint. You will also wish to cut flaps in the side of your base rectangles. There is no need to add flaps to the bottom, so only three sides need to be cut.
Step 5: Paint one side white (if necessary). If you were unable to obtain cardboard that is white on one side, you will need to paint it. Make sure you do this in a spot that is well-ventilated.
Use flat (not glossy) white paint and rollers. We do not recommend spray paint, no matter how well-ventilated an area you are working in, because it is difficult to apply evenly, and the constant pressure on your hand will quickly become a pain.
You may wish to paint the interior of the base black, which will cut down on the light reflected from the projector and enhance the brightness of the stars.
Labeling the triangles is the simplest way to differentiate between them, but we chose to take it a step further. We painted the exterior of our A triangles black, creating a reverse-soccer ball look to our dome and making it easier and faster to piece the dome together.
But why white and not black for the interior of the dome?
This is a question that students may ask. Although you might think that a black dome would bear a greater resemblance to the night sky, most professional planetariums have a white surface (look up the next time you are settling into your seat). The reason hearkens back to elementary science, where we learn that black absorbs light, while white reflects it. Stars on a white surface will be seen more easily than the same light on a black dome.
Assemble your dome
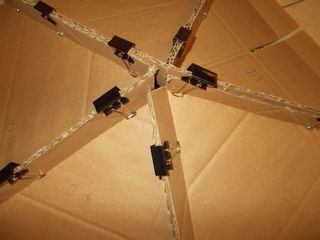
Step 6: Clip panels together. To clip panels together, point the interior side of the triangle down, bend the flaps up, and clip or bolt those flaps together. Use at least three, if not four, clips per joint, or three sets of nuts-and-bolts with washers.
First, create a pentagon of five B triangles, with the long (equilateral-length) side facing out. Keep in mind that this is a three-dimensional triangle, so they won't fit together lying flat but will instead bulge into a small dome. (This caused us some stress when we couldn't fit them together flat, and relief when we realized the reason) Make a total of six of these pentagons.
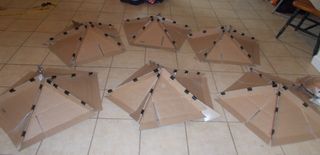
Step 7: Attach roof panels. Take one of the pentagons and attach five A triangles to each outside edge. This will be the center "roof" of your dome.
Step 8: Connect pentagons. Set the remaining five pentagons in a circular pattern on the floor and connect an A triangle at the bottom to connect them together. The more hands you have, the better.

Step 9: Attach the top. Next, you will add the first, A-encircled pentagon from step 7 to bridge the top of the dome. This works best with one person holding the pentagon up while another clips the joints together.
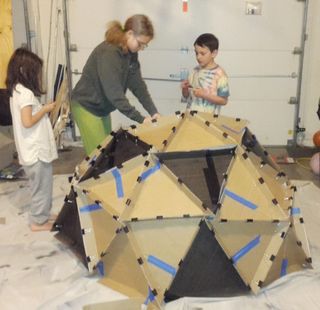
Step 10: Form the base. Attach your rectangles together to form the base. Lift the dome up (again, multiple hands is best) while one person clips the sides. Your planetarium is complete!
Step 11: Check for light leaks. You will want to check for light leaks and patch over them as best as possible. If you still have problems, you can throw a sheet over the exterior of your dome to further block light.
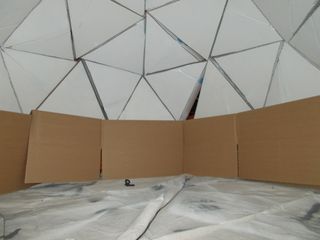
Adding a projector
The next step will be the addition of a projector. There are many commercially available star projectors that can make your teaching process go smoothly. Additionally, computer software combined with a laptop and standard projector can enable you to create personalized shows.
[BUY a Home Planetarium Projector]
Large planetarium addition
Thirty people inside a dome of cardboard can become stuffy. Cut a circular hole in one of the panels across from the door (not next to it). Attach a cardboard box frame with the back end removed. Place three baffles, preferably painted black, inside of the box in a zigzag pattern to block light leaks. Place a fan at the other (open) end of the box to circulate air.
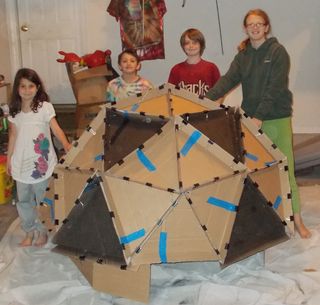
Inspiration for this project came from A Planetarium for Every Classroom.
More science fair projects & science experiments:
Join our Space Forums to keep talking space on the latest missions, night sky and more! And if you have a news tip, correction or comment, let us know at: community@space.com.
Get the Space.com Newsletter
Breaking space news, the latest updates on rocket launches, skywatching events and more!

Nola Taylor Tillman is a contributing writer for Space.com. She loves all things space and astronomy-related, and enjoys the opportunity to learn more. She has a Bachelor’s degree in English and Astrophysics from Agnes Scott college and served as an intern at Sky & Telescope magazine. In her free time, she homeschools her four children. Follow her on Twitter at @NolaTRedd
